
24x7 Backup, SPAM & Virus Protection
|
 |
Set Up IMAP - Outlook® 2010
To set up Outlook 2010 for IMAP, perform the following steps:
- In Outlook, click the File tab.
- Click the Account Settings button, and select Acount Settings.
- Click the New button.
- Click the Manually configure server settings or additional server types option button.
- Click the Next button.
- Ensure that the Internet E-mail option button is selected, and click the Next button.
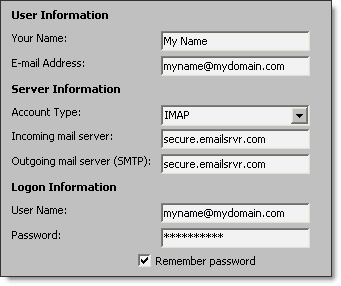
- Enter the following information:
- Your Name—Enter your first and last name. This is the name that will appear in the From field of messages you send.
- E-mail Address—Enter your entire email address (e.g., myname@mydomain.com).
- Account Type—Select IMAP from the drop-down menu.
- Incoming mail server—Enter the secure server name:
secure.emailsrvr.com
- Outgoing mail server (SMTP)—Enter the secure server name:
secure.emailsrvr.com
- User Name—Enter your entire email address (e.g., myname@mydomain.com).
- Password—Enter the password for your email account.

- Click the More Settings button.
- Click the Outgoing Server tab.
- Select the My outgoing server (SMTP) requires authentication check box. Leave the default setting, Use same settings as my incoming mail server.

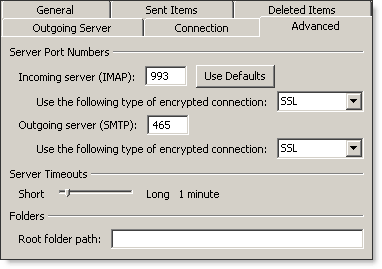
- Click the Advanced tab.

- In both of the Use the following type of encrypted connection drop-down menus, select SSL.
- In the Incoming server (IMAP) box, enter the secure incoming port: 993
- In the Outgoing server (SMTP) box, enter the secure outgoing port: 465..
If you are unable to use port 465, you can use one of the following alternate SMTP ports: 587 or 8025.
- Click the OK button.
- Click the Next button.
- Click the Finish button.
- Click the Close button.
IMAP Folders
Folders should sync automatically with an IMAP account; however, if you have added folders in Webmail and they are not showing in Outlook, perform the following steps:
- Right-click the account name in the folder list panel.
- Select IMAP Folders.
- Click the Query button.
- Select the newly added folder(s), and click the Subscribe button.
- Click the OK button.
- Restart Outlook to update the folder list.
- Confirm that you see a Spam folder.
If you do not want an IMAP Spam folder, request your mail server administrator or VMS/TactiCom to change your spam filtering. Spam settings available are to disable spam filtering on the server, forward spam to another e-mail address, or appended [Spam] to the subject of suspected spam messages. You can create a local outlook filter to filter messages with [Spam] in the subject line.
Don't forget to remove your old Virtual Mail Servers account!
|
 |